


Deep Learning Installation Tutorial - Index
Dear fellow deep learner, here is a tutorial to quickly install some of the major Deep Learning libraries and set up a complete development environment.
- Part 1 : Installation - Nvidia Drivers, CUDA and CuDNN
- Part 2 : Installation - Caffe, Tensorflow and Theano
- Part 3 : Installation - CNTK, Keras and PyTorch
- Part 4 : Installation - Docker for Deep Learning
Deep Learning Installation Tutorial - Part 1 - Nvidia Drivers, CUDA, CuDNN
There are a few major libraries available for Deep Learning development and research – Caffe, Keras, TensorFlow, Theano, and Torch, MxNet, etc. These libraries use GPU computation power to speed up deep neural networks training which can be very long on CPU (+/- 40 days for a standard convolutional neural network for the ImageNet Dataset).
NVIDIA is definitely the GPU brand to go for Deep Learning applications, and for now, the only brand broadly supported by deep learning libraries.
In these Tutorials, we will explore how to install and set up an environment to run Deep Learning tasks.
A few useful links:
- NVIDIA Drivers and Libraries:
- Deep Learning Libraries and Frameworks:
- Caffe: http://caffe.berkeleyvision.org
- Caffe2: https://caffe2.ai
- Microsoft Cognitive Toolkit: https://www.microsoft.com/en-us/cognitive-toolkit
- DeepLearning4J: https://deeplearning4j.org
- Keras: https://keras.io/
- Lasagne: http://lasagne.readthedocs.io/en/latest
- MxNet: http://mxnet.io
- PyTorch: http://pytorch.org/
- Tensorflow: https://www.tensorflow.org/
- TensorLayer: http://tensorlayer.readthedocs.io/en/stable/
- Theano: http://deeplearning.net/software/theano
- Torch: http://torch.ch
- Development Environments:
- Apache Singa: http://singa.apache.org
- DeepForge: https://github.com/deepforge-dev/deepforge
- Digits: https://developer.nvidia.com/digits
- Polyaxon: https://github.com/polyaxon/polyaxon
- Virtualisation Platforms:
- Docker: https://www.docker.com
- Nvidia-Docker: https://github.com/NVIDIA/nvidia-docker
In this post, we will install drivers and dependencies for GPU Computation.
- CUDA: "CUDA is a parallel computing platform and application programming interface (API) model created by Nvidia" (Source)
- CuDNN: "The NVIDIA CUDA Deep Neural Network library (cuDNN) is a GPU-accelerated library of primitives for deep neural networks." (Source)
A compilation of tools porvided by NVIDIA, very useful for Deep Learning but not only.
Prerequisites
This Tutorial has been tested and runned on Ubuntu 14.04 on the 30th May 2016
Feel free to share and spread the word if you liked the article
In this tutorial, we will assume that you are using Ubuntu 14.04 or 16.04 (LTS versions).
First of all, we need to be sure that the system your are using is up to date:
sudo apt-get update
sudo apt-get upgrade -y
sudo apt-get dist-upgrade -y
A. NVIDIA Drivers:
First of all, we will install the latest Nvidia drivers. In order to have a fresh-start, let us be sure that there exists to previous nvidia software on the machine:
sudo apt-get remove nvidia*
sudo apt-get autoremove
Then let's intall the dependencies :
sudo apt-get install dkms build-essential linux-headers-generic apt-show-versions
Then we will need to blacklist the "nouveau" driver (an open-source retro-engineered nvidia driver):
sudo vi /etc/modprobe.d/blacklist-nouveau.conf
You will need to add the following lines:
blacklist nouveau
blacklist lbm-nouveau
options nouveau modeset=0
alias nouveau off
alias lbm-nouveau off
Linux Newbie Advice:
Disable the nouveau kernel by typing the following commands:
echo options nouveau modeset=0 | sudo tee -a /etc/modprobe.d/nouveau-kms.conf
sudo update-initramfs -u
Now, you need to search for the latest NVIDIA driver specific for your graphic card and your system. Please select Linux 64-bit for your operating system. You can find it on the official website: nvidia's website

Execute the following commands to install the NVIDIA Drivers.
wget http://us.download.nvidia.com/**********/NVIDIA-Linux******************.run ## Copy here the link you have copied
chmod +x NVIDIA-Linux******************.run
Let's install the dependencies:
sudo apt-add-repository ppa:ubuntu-x-swat/x-updates #if it fails, you may need to repeat the operation.
sudo apt-get update
sudo apt-get install nvidia-current -y
sudo apt-get upgrade -y
Let's launch the NVIDIA Driver Installation:
sudo ./NVIDIA-Linux******************.run
Follow the instructions displayed on screen.
- You may have a warning "The distribution-provided pre-install script failed! Are you sure you want to continue ?" => You can continue.
- Register the kernel module with DKMS => YES !
- If you don't have 32bits compatibility you will get a warning => OK !
- Run NVIDIA-Xconfig => YES !
And restart
sudo reboot
You can test the installation is okay by executing :
Remark: The output might be different from mine depending on the version you installed and your hardware, I have 3 GTX Titan X.
root@machine: nvidia-smi

+------------------------------------------------------+
| NVIDIA-SMI ***.**    Driver Version: ***.**          |
|-------------------------------+----------------------+----------------------+
| GPU  Name        Persistence-M| Bus-Id        Disp.A | Volatile Uncorr. ECC |
| Fan  Temp  Perf  Pwr:Usage/Cap|         Memory-Usage | GPU-Util  Compute M. |
|===============================+======================+======================|
|   0  GeForce GTX TIT...  Off  | 0000:05:00.0     Off |                  N/A |
| 22%   59C    P0    74W / 250W |     23MiB / 12284MiB |      0%      Default |
+-------------------------------+----------------------+----------------------+
|   1  GeForce GTX TIT...  Off  | 0000:06:00.0     Off |                  N/A |
| 22%   60C    P0    72W / 250W |     23MiB / 12284MiB |      0%      Default |
+-------------------------------+----------------------+----------------------+
|   2  GeForce GTX TIT...  Off  | 0000:09:00.0     Off |                  N/A |
| 22%   54C    P0    53W / 250W |     23MiB / 12284MiB |      0%      Default |
+-------------------------------+----------------------+----------------------+

+-----------------------------------------------------------------------------+
| Processes:                                                       GPU Memory |
|  GPU       PID  Type  Process name                               Usage      |
|=============================================================================|
|  No running processes found                                                 |
+-----------------------------------------------------------------------------+
B. Installing CUDA
Nowadays, in July 2017, CUDA 8.0 and cuDNN 5.1 are the latest supported libraries, however it can rapidly change. You definitely should check if these information are still revelant at the time you are using this tutorial. The version of CUDA and cuDNN you need to choose mostly depends on the deep learning library you are planning to use. Check the official documentations for further details.
I will assume that you need CUDA 8.0 and cuDNN 5.1 for this tutorial, feel free to adapt and explore.
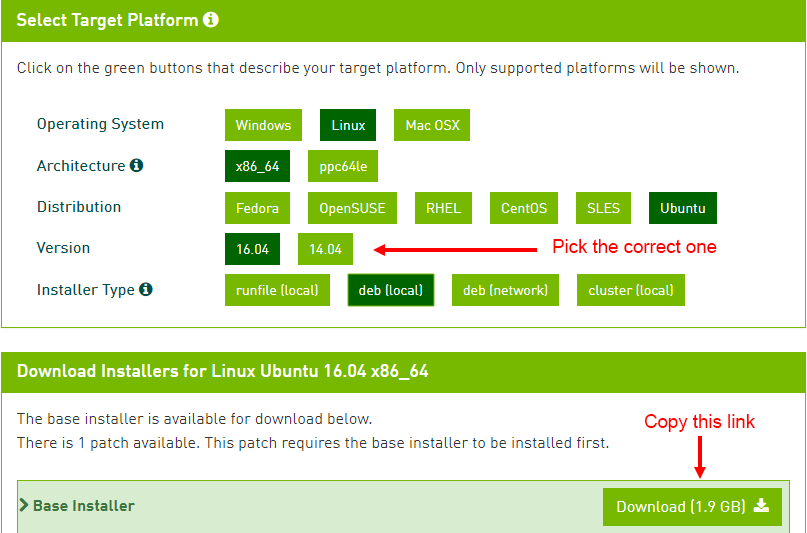
You will need to open the following webpage and copy the library download link: nvidia cuda download
Main source for this step is Markus Beissinger’s blog post on setting up Theano.
sudo apt-get install -y gcc g++ gfortran build-essential \
  git wget linux-image-generic libopenblas-dev python-dev \
  python-pip python-nose python-numpy python-scipy

# downloading the (currently) most recent version of CUDA 8.0
sudo wget http://developer.download.nvidia.com/******/cuda-repo-ubuntu******.deb #copy here the link obtained above

# installing debian package for CUDA
sudo dpkg -i cuda-repo-ubuntu***************.deb

sudo apt-get update
sudo apt-get install cuda

# setting the environment variables so CUDA will be found
echo -e "\nexport PATH=/usr/local/cuda-8.0/bin${PATH:+:${PATH}} " >> .bashrc
echo -e "\nexport LD_LIBRARY_PATH=/usr/local/cuda-8.0/lib64\${LD_LIBRARY_PATH:+:${LD_LIBRARY_PATH}}" >> .bashrc
You can test the installation is okay by executing :
root@machine: apt-show-versions cuda
**cuda:amd64/unknown 8.0-** uptodate**

root@machine: cat /proc/driver/nvidia/version
NVRM version: NVIDIA UNIX x86_64 Kernel Module  ***.**  ************************
GCC version:  gcc version *.*.* (Ubuntu ****************)
Now close your shell or the SSH connection and re-open it.
# installing the samples and checking the GPU
cd /usr/local/cuda-8.0/samples/5_Simulations/nbody
sudo make
./nbody
If successful, a new window will popup running n-body simulation.
C. Installing CuDNN
To further speed up deep learning relevant calculations it is a good idea to set up the cuDNN library. For that purpose you will have to get an NVIDIA developer account and join the CUDA registered developer program. The last step requires NVIDIA to unlock your account and that might take one or two days. But you can get started also without cuDNN library. As soon as you have the okay from them – download cuDNN and upload it to your instance.
cd ~
wget http://developer.download.nvidia.com/*********************************************/cudnn-*.*-linux-x64-*******.tgz

# unpack the library
tar -xzvf cudnn-8.0-linux-x64-v5.1.tgz

sudo cp cuda/include/cudnn.h /usr/local/cuda/include
sudo cp cuda/lib64/libcudnn* /usr/local/cuda/lib64
sudo chmod a+r /usr/local/cuda/include/cudnn.h /usr/local/cuda/lib64/libcudnn*
D. Conclusion
Now you have a fully set up instance with all the necessary libraries to install the required deep learning libraries. You can continue with the next steps:
Comments !